NfSen is a graphical web based front end for the nfdump
netflow tools.
NfSen allows you to:
Display your netflow data: Flows, Packets and Bytes using RRD (Round Robin Database).
Easily navigate through the netflow data.
Process the netflow data within the specified time span.
Create history as well as continuous profiles.
Set alerts, based on various conditions.
Write your own plugins to process netflow data on a regular interval.
Different tasks need different
interfaces to your netflow data. NfSen allows you to keep all the
convenient advantages of the command line using nfdump directly and
gives you also a graphical overview over your netflow data.
NfSen
is available at sourceforge
and distributed under the BSD
license.
Versions:
Stable:
1.3.6 for use with nfdump Dec 31, 2011
1.6.5.
Snapshots: May be provided between
stable releases and are published as snapshot-yyyymmdd
This documentation refers to version 1.3.2
Note: All IP addresses in this document are anonymized. Any coincidence with real IP addresses is by pure chance.
NfSen is hosted by Sourceforge:
|
|
|
|
|
NfSen - General Overview Page |
NfSen – Navigation Page |
NfSen - Navigation Page |
|
|
|
|
|
NfSen - Netflow Processing output |
NfSen - Profile Info |
NfSen - Alerting |
PHP and Perl:
NfSen is written
in PHP and Perl and should run on any *NIX system.
At least Perl
5.6.0 and PHP > 4.1 is required including the Socket and
Perl regex extension.
Perl Modules:
NfSen alerting
requires the following Perl Modules:
Mail::Header, Mail::Internet
RRD tools
All netflow graphs in
NfSen require RRD. At least the RRDs Perl Module is required.
You
will find all about RRD here.
Nfdump tools
The nfdump tools
are the backend tools for NfSen and will collect and process the
netflow data.
Make sure, that you have version 1.5.8 installed.
Don't try any version < 1.5.5, or the profiles will not work.
You
can download nfdump from sourceforge nfdump.sourceforge.net.
NfSen has a very flexible directory
layout. To simplify the first time installation, a default config
file is provided, which requires only little changes to work. The
default layout stores everything but the html pages under BASEDIR.
However, you may configure NfSen to fit your local needs. The figure
below shows the default layout with most configurable
directories.
All netflow data is stored under PROFILEDATADIR. So
make sure you have enough disk space for this directory. You may also
mount a dedicated disk volume to PROFILEDATADIR.

Directory Structure
If you have installed all
prerequisites, change to the etc directory and copy the NfSen
template config file nfsen-dist.conf to
nfsen.conf.
Edit nfsen.conf according your needs.
When you are done with nfsen.conf, run the install.pl script in the NfSen distribution directory:
./install.pl etc/nfsen.conf
Running install.pl will:
Create the NfSen environment under BASEDIR
Copy the php/html files into the HTMLDIR
Create the live profile.
Prepares the RRD DBs for the live profile.
Creates and configures config.php
After the installation, you will find the nfsen.conf file in CONFDIR. This documentation, is installed in DOCDIR. However. the web page has no direct link to the documentation.
The installer supports upgrading from NfSen version 1.2.x. Upgrading from NfSen versions < 1.2 will not wok. You will first need to upgrade these installations to 1.2.4 and then to 1.3.x.
To upgrade your current NfSen installation:
Stop old nfsen, due to nfprofile
incompatibilities.
./nfsen.rc stop
Upgrade nfdump to stable 1.5.6. Do not forget to configure
nfdump with --enable-nfprofile option.
This update
is required!
Upgrade NfSen:
./install.pl
<path/to/your/nfsen/etc/nfsen.conf>
This will update your current NfSen installation. and you're done.
Note:
As of snapshot
20060325, NfSen changed the RRD DB layout to enable 'on the fly'
add/delete of netflow sources. This requires to convert all RRD DBs
from all profiles from old style to new style layout. This is done
automatically at installation time but will take some time to
complete. Do *NOT* interrupt the conversion process at any
time or your nfsen installation will be corrupted. Once you upgraded
you can not downgrade NfSen to an older version.
If you have plugins installed, check the README.plugins file for some small changes required to be for each plugin. If you have PortTracker installed, you need to update to the PortTracker version included in the contrib directory, coming with NfSen. You need not to rebuild your current db files, just rebuild nftrack and replace the plugin files. See the INSTALL file.
Start NfSen:
BINDIR/nfsen start
Each channel in NfSen has a collector associated. Therefore additional parameters are required for each channel. All these settings are stored in the config file nfsen.conf. To add/remove netflow sources edit the nfsen.conf file. Make appropriate changes such as adding/deleting entries in the %sources hash. When done, run ./nfsen reconfig on the command line. This will create or delete the channels as well as stop/start the collectors as necessary. Note: If you make some changes on existing channels in the %sources hash, this does not require to reconfig NfSen. Simply stop and start NfSen.
The nfsen command in
BINDIR is also used to start and stop NfSen. You may create a
soft link from your appropriate rc.d directory to this file., or
include this command into the BSD style rc.local file.
To
start NfSen:
BINDIR/nfsen start
This starts all nfcapd processes to collect the netflow data and the nfsend background process to update your profiles, as new data becomes available. Point your web browser to nfsen.php. ( Typically http://yourserver/nfsen/nfsen.php ).
To stop NfSen:
BINDIR/nfsen stop
The background task nfsend as well as nfcapd log to syslog. nfsend is very chatty, when configuring syslog priority 'info' or less. You may want to set the syslog priority to 'warning' for normal operation. For debugging purpose, use 'info' or 'debug'.
NfSen has two different user interfaces:
Web Interface
Command line interface
Most of the time you will want to use the web interface. However, you can almost do everything from the command line as well. The command line interface is described in more details later in this document.

Tab
Navigation
The navigator bar allows you to select the different views.
The default view is Home, when you point your browser to
nfsen.php. It shows an overview of the currently selected profile. By
default, this is the live profile. The three columns show the
'Flows', 'Packets' and 'Bytes'
history.
If the currently selected profile is a continuous
profile, the page is automatically refreshed every 5 minutes to
update the graphs. This allows you to have a browser window on your
screen, with always up to date graphs. The Graphs tab adds a
sub navigator bar, where you see again the 'Flows',
'Packets' and 'Bytes' graphs but bigger
in size. When clicking on one of the graphs in either view, you will
be automatically switch to the 'Details' view for
further investigation processing.
Detailed navigation and investigation of the netflow data is done in the 'Details' view. When entering this view, you will see the navigation display.
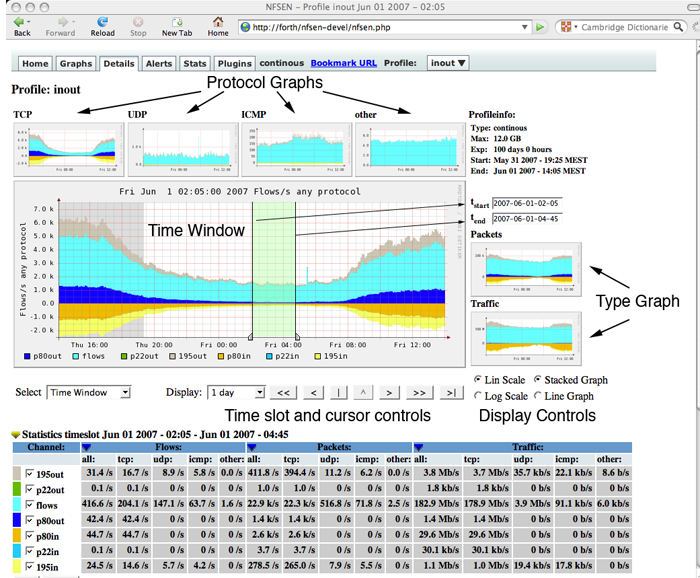
Navigation
Display
Netflow
Processing Controls
The page is divided into two parts: The upper part allows you to navigate through the netflow data as well as selecting a single time slot or time window. The lower part contains all the controls to process the netflow data of the selected time slot or time window.
Clicking on any of the small protocol
or type graphs will replace the main graphics with the selected
graph. You can switch back and forth and select the protocol and/or
type for the main graph, which is appropriate for investigating your
current situation. The bigger main graph is automatically split into
the protocols 'TCP', 'UDP', 'ICMP' and 'other', which is 'not (proto
tcp or proto udp or proto icmp)', whenever you switch the type. To
'flows', 'packets' or 'bytes'.
The
available time span of the graph can be changed using the pull down
menu, just below the main graph:

Select
Time Span
A time slot starts at every 5 minutes cycle of the hour ( 0, 5, 10, 15 etc. ) and lasts 5 minutes. On the other side a time window consists of several time slots. When entering the 'Details' view a window scale of one days is selected so you will see the last 24 hours of the profile. The time cursor is placed in the middle of the begin and end of these 24 hours and the time window slot is set to one time slot. You will see the selected time slot or time window always in the title of the browser window, in the title of the main graph as well as above the small type graphs in the upper right section of the main graph. There are several ways to change the current time slot.
The most easiest one is by simply clicking into the graph at the appropriate time slot. This immediately move the cursor to the selected position.
You may also very easily dragging the handle of the cursor to the select time slot within the selected time span.

Fig.
Drag Handle to move time slot
While moving the handle, the current selected time slot is automatically updated in tstart and tend on the right hand side of the graph. When releasing the handle, the cursor automatically snaps to the nearest time slot and the values in the statistics table are updated accordingly.
Other ways selecting a different time slot using the control buttons below the main graph:
Using the time cursor
controls: ![]()
|
> |
Next time slot: Advance time by 5 minutes. |
|
< |
Previous time slot: Go back 5 minutes. |
|
>> |
Advance time slot by a full time span of the graph. |
|
<< |
Go back by a full time span of the graph. |
|
>| |
Go to the end of the profile. ( current time slot ) |
|
| |
Center time cursor in current graph. |
|
^ |
Place cursor at the peak, found within +/- 1 hour time-span of current cursor position. |
The graphs are immediately updated, when selecting
a different time slot. However, there are limits for moving the
cursor. The cursor can not be moved outside the visible part of the
graph on the left or right hand side. You may also not move the
cursor outside a time slot where data has expired and no data is
available for processing. This limit is marked by the dark grey area
on the left hand side of the graph.

Fig.
Border of available Data
Sometimes it is desirable to select and process more than a single 5 min time slot. From the menu below the main graph select 'Time Window'

Fig.
Select time window
This splits the cursor handle into two halves, which can be dragged individually as needed. Drag the left and/or right border of the selected window as needed.

Selected
Time Window
The statistics summary is automatic updated, when releasing either handle, when moving. To switch back to a single time slot, select 'Single Timeslot' from the menu..
The statistic summary below the main graph gives you an overview about flows, packets and traffic of the selected time slot or time window. Each line corresponds to one configured netflow source in profile 'live' or to a configured channel in any other profile. For easy visual matching a small colour field with the same colour as in the the graph prepends each row. If you are interested in only some of the channels, you may remove the others by clicking the checkboxes. This disables or enables this channel in all graphs and in the statistics respectively.
The statistic summary can be switched between the total sum of the selected time window, or the rate values per second. The scaling factors for K, M and G are 1000.

Fig.
Summary Statistics
Individual columns can be collapsed or expended as needed, by clicking on the blue triangles. The entire statistics can be shown or hidden by clicking on the yellow triangle. When collapsing a column, a single column remains with the type, which is shown in the main graph.

Fig.
Expand/Collapse stat

Disabled
sources 'upstream' and 'gateway'
Enabling or disabling channels re-scales the graphs
according the remaining sources, you get a more detailed graph and a
different resolution on the y-axis.
To view the details your are interested in, a graph may be displayed with different options:
Scale:
Linear y-axis
Logarithmic y-axis.
Graph Type:
Stacked: All sources are drawn on top of each other.
Line: All sources are drawn independent.
You may switch at any time the display option by clicking on the appropriate radio buttons in the lower right corner of the main graph. You may spot more easily peaks in some of the sources by switching to the line graph display option.

Fig.
Line graph
Once you have selected the time window of interest, you can process and filter the netflow data according your needs, using the process form in the lower part of the window:
Select the netflow sources to process. You may select multiple sources.
Enter a netflow filter. The syntax conforms to the nfdump filter syntax.
Select any options for the analysis.
Click 'process'.
A
default filter is supplied when a specific protocol is selected in
the main graph. You may add any further filter expressions as
needed.
By just clicking process, a top 10 statistics of the any IP address ordered by flows is calculated. However, you may change this at any time.
The sources, the filter as well as all options from the processing form are compiled into the appropriate nfdump command. For convenience a short description of the filter syntax and options follows. More details are available in the nfdump(1) man page.
The filter syntax is similar to the
well known pcap library used by tcpdump. The filter can span several
lines. Anything after a '#' is treated as a comment and ignored to
the end of the line. There is virtually no limit in length of the
filter expression. All keywords are case independent, unless
otherwise noted. For a complete filter syntax see the nfdump(1)
man page.
Any filter consists of one or more expressions expr.
Any number of expr can be linked together:
Filter = expr, expr and expr, expr or expr, not expr, ( expr ), not ( expr )

expr can be one of the following filter primitives:
Any
  any Used as dummy filter. Use 'not any' to block all flows.
protocol version
 inet or ipv4 for IPv4 and inet6 or ipv6 for Ipv6
protocol
 proto <protocol> where protocol can be any known protocol  such  as
 TCP, UDP, ICMP, GRE, AH etc. or proto num where num is the protocol number.
IP address
  [SourceDestination] IP <ipaddr> or
  [SourceDestination] HOST <ipaddr> with <ipaddr> as any valid IPv4 or  IPv6  address. SourceDestination  may  be omitted.
  [SourceDestination] IP IN [<iplist>]
  [SourceDestination] HOST IN [<iplist>]
  iplist space separated list of individual <ipaddr>
[SourceDestination]
 defines the IP address to be selected and can be SRC DST or any combination of SRC and|or DST.
 Omitting SourceDestination is equivalent to SRC or DST.
[inout]
 defines the interface to be selected and can be IN or OUT.
network
 [SourceDestination] NET a.b.c.d m.n.r.s for IPv6 network netmask pair
 [SourceDestination] NET net/num with net as a valid IPv4 or IPv6 network and num as mask bits.
 The  number  of  mask  bits  must match the appropriate address family IPv4 or IPv6. Networks
 may be abbreviated such as 172.16/16 if they are unambiguous.
Port
 [SourceDestination]  PORT [comp] num with num as a valid port number.  If comp is omitted, '=' is assumed.
 [SourceDestination] PORT IN [<portlist>]
 portlist space separated list of individual port numbers
Interface
 [inout]  IF num with num as an interface number.
Flags
 flags tcpflags
 With tcpflags as a combination of:
 A ACK.
 S SYN.
 F FIN.
 R Reset.
 P Push.
 U Urgent.
 X All flags on.
The ordering of the flags is not relevant. Flags not mentioned are treated as don't care. In order
to get those flows with only the SYN flag set, use the syntax 'flags S and not flags AFRPU'.
TOS
 tos value
 Type of service: Value 0..255.

Packets
 packets [comp] num
 Limit the packet count in the netflow record.

Bytes
 bytes [comp] num
 Limit the byte count in the netflow record.

Packets per second: Calculated value.
 pps [comp] num [scale] to specify the pps of the flow.
Duration: Calculated value
 duration  [comp] num to specify the duration in milliseconds of the flow.
Bits per second: Calculated value.
 bps [comp] num [scale] to specify the bps of the flow.
Bytes per packet: Calculated value.
 bpp [comp] num [scale] to specify the bpp of the flow.
AS
 [SourceDestination] AS num with num as a valid AS number.
[scale] scaling factor. Maybe (Kilo) k, (Mega) m, (giga) g, (Terra) t. Factor is 1024.
          [comp]
The following comparators are supported:
 =, ==, >, <, EQ, LT, GT. If comp is omitted, '=' is assumed.
Examples:
tcp and ( src ip 172.16.17.18 or dst ip 172.16.17.19)
tcp and ( net 172.16/16 and src port > 1024 and dst port 80 ) and bytes > 2048An often used filter can be saved and used at any time later while processing flows. To create such a custom filer, enter the filter in the text box and click on the diskette symbol to save your filter. After successfully saved, the filter is available in the select box. The resulting filter is always the filter in the text box and the named filter, therefore logically linked 'and' . A named filter may be delete or edited at any time by selecting the filter and clicking on the appropriate icon – either edit, or delete. The named filters are store in a file under BASEDIR/var/filters and can also be changed there.

Fig.
Default Filter
When processing netflow data, there are two general options. Listing flows and creating a flow statistics. You can switch between the two options by clicking on the appropriate button. Depending on what you have selected, the panel automatically adapts to all available options.
|
List Flows |
|
|
Limit to |
List only the first N flows of the selected time
slot |
|
Aggregate |
Option to aggregate the flows. |
|
Sort |
When listing flows from different channels/sources you may sort
them according the start time of the flows. Otherwise the flows
are listed in sequence of the selected channels. |
|
Output |
Select one of the available formats to list the flows. The
predefined formats 'line', 'long' and 'extended'
are always available and correspond the the output formats of
nfdump likewise. However, you may specify any time additional
output formats by selecting 'custom ...'. Enter your own
format now in the text input which appears. The format is
equivalent to the format specification described in the nfdump(1)
man page.
By clicking on the diskette symbol, you save your
new format, which appears now in the selection menu, ready to use.
|
|
Stat TOP N |
|
|
Top |
Limit the statistics to the first top N |
|
Stat |
Select the statistics you want from the menu and the order
option |
|
Aggregate |
This option is only available for the flow record statistics
and is equivalent to the aggregate option in List flows.
See the description above. |
|
Limit |
Limit the output only to those statistic lines whose packets or
bytes match the specified limit. |
|
Output |
This option is identical to the Output option in 'List flows' . See the description above. |

Note:
Depending on the size of your network, netflow
processing may consume a lot of time and resources, when you select a
large time window and multiple resources.
All IP addresses in the flow or statistic listing can be easily looked up by clicking on the IP address. The result of the cyberwhois.org, maintained by Philippe Bourcier, is shown in a lookup box.

Fig.
IP Lookup
However, you may customize this lookup by creating your own lookup. In the $LIBEXECDIR copy the module Lookup.pm to Lookup_site.pm and change the Lookup function according to your own needs. Do not forget to change the module name to 'Lookup_site'. Do not modify the original Lookup module, as any future NfSen update may overwrite your changes.
A profile is a specific view on the netflow data. A profile is
defined by its name, type and one or more profile
filters, which are any valid filters accepted by nfdump.
At
least the profile 'live' is always available and is used to
store your incoming netflow data without filtering. You can switch
back and forth to any profile using the pull down menu in the upper
right corner of the web page.

Fig.
Profile Selection
A profile can be either of type History or Continuous. A history profile starts and ends back in the past and remains static. It neither grows nor expires. A continuous profile may start in the past and is continually updated while new netflow data becomes available. It grows dynamically and may have its own expire values set. Old data expires after a given amount of time or when a certain profile size is reached. Additionally a profile can be created as a Shadow profile, which means no netflow data is collected, and therefore saves disk space. A shadow profile accesses the data of profile 'live' when data processing is done with the proper profile filters applied first.
|
Continuous
|
History
|
|
Continuous / Shadow
|
History / Shadow
|
A profile contains one or more profile channels. A profile channel is defined by its channel filter, colour, sign and order in which the channel is displayed in the graph. A channel is based on one or more netflow sources from the 'live' profile. The number of channels is independent of the number of netflow sources.

Fig.
Profile Channels

Fig.
Profile Examples
Select the "New profile ..." entry in the profile pull
down menu. Complete
the 'New Profile' form to start building the profile. By moving the
mouse over the '?' icon, a help text appears to guide you
through the process of creating the profile.
Complete
the 'New Profile' form to start building the profile. By moving the
mouse over the '?' icon, a help text appears to guide you
through the process of creating the profile.
Profiles may be grouped together for easier selection in the profile menu. Select either an existing profile group, or create a new group according to your needs. There is no difference to other profiles other than grouping the profiles in the profile menu.
The profile type 'Continuous' or 'History' is automatically detected according the 'Start' and 'End' values you enter. As profiles are created from netflow data from profile 'live', the start and end of the profile must fall in the time range of the profile 'live'.
If you leave the 'Start' and 'End' inputs empty, a continuous profile is created and starts from the time the profile is created.
If you enter a 'Start' time but no 'End' time, a continuous profile is created. Data from the past up to to time, the profile is created is profiled and updated immediately when the profile is created.
If you enter a 'Start' and 'End' time a history profile is automatically created.
Expire / Max Size
A continuous profile may expire due to
the age of the data or the profile size used on disk. Expiring starts
whenever one of the two limits is reached. Expiring ends at the
configured value $low_water ( in % ) in the config file
nfsen.conf. By setting any of these values to 0, the limit does not
apply.
1:1 Profile
For compatibility with NfSen version 1.2.x a
profile with 1:1 channels may be created, which means, that for every
netflow source in the live profile a corresponding channel in the
profile will be automatically created. The selected sources and the
filter in the profile create dialogue are taken for this 1:1 profile.
This is the easiest type of a profile.
Individual Channels
For new style profiles select this
option. In the 'new profile' dialogue entries for netflow sources as
well as for the common filter disappears, as these parameters are now
individual for each channel and entered in the channel dialogue.
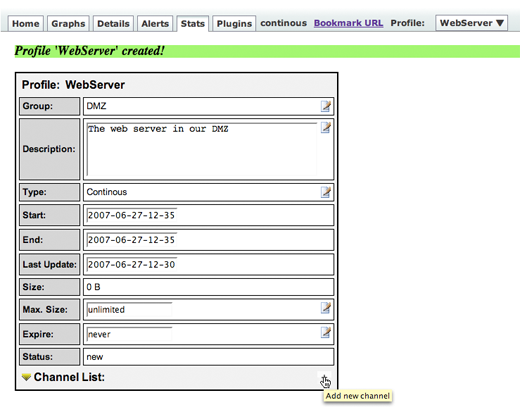
Fig.
Successful creation of a new profile with individual channels.
Creating channels
After the profile has been
successfully created, one or more channels can be added now by
clicking on the '+' icon at the right hand side of the
'Channel List'.

Fig.
Channel Dialogue
The parameters colour, sign and order are used to display the channel correctly in the graph. The filter as well as the netflow sources are needed to correctly profile the channel. The procedure of adding a channel to a new profile can be repeated as often as required to complete the profile. When all channels are added the new profile must be committed to activate the new profile. This is done by clicking on the checkmark on the right hand side of the 'Status' line.

Fig.
Commit new profile
Once the profile is committed, the build process starts if required. Depending on how long back in the past the profile starts, this can take a considerable amount of time. You can follow the build process by looking at the progress bar, showing you the percentage of completion. This progress bar is updated automatically every 5 seconds. Note: There are no graphs available in the profile as long as the profile is not completely built.

Fig.
Progress of building the profile
Please note: For the 'live' profile, channels have to be configured in nfsen.conf.
Profiles can be modified by selecting the 'Stat' tab of the
profile and click on any of the available edit icons
![]() of the desired parameter. By clicking on the edit icon of a channel,
you may modify the requested channel. All changes will affect the
profile immediately. You may also add or delete channels in a
continuous profile. However, please note, that adding a new channel
to an already existing profile will not rebuild any data for this
channel for data in the past. Deleting a channel or the entire
profile may be done by clicking on the trash icon.
of the desired parameter. By clicking on the edit icon of a channel,
you may modify the requested channel. All changes will affect the
profile immediately. You may also add or delete channels in a
continuous profile. However, please note, that adding a new channel
to an already existing profile will not rebuild any data for this
channel for data in the past. Deleting a channel or the entire
profile may be done by clicking on the trash icon.
Profile may be converted into another type as desired. However, not all conversions are possible. The figure below shows and explains the possible conversions.

Fig.
Profile conversion
By switching a profile type between continuous and history you may temporary stop collecting data for a profile or continuing to collect data from a stopped profile. Note, that you will loose all netflow data, when a profile is converted to a shadow profile. When switching back, the data recording resumes at the time of switching.
Alerts allow you to execute specific actions based on specific conditions. An alert is defined by a filter applied to the 'live' profile, conditions, triggers and alert actions.

|Fig.
Alert Flow
Alerts can be defined and viewed under the 'alert' tab, by clicking on the '+' icon.

Fig.
New Alert
Complete the new alert dialogue:

Fig
New Alert Dialogue
Alert Filter:
The alert filter is based on
the 'live' profile. Enter an appropriate filter here. All
following conditions are based on the result of this filter.
Conditions:
Conditions are based either on
the flow summary or on the top 1 statistic. Conditions may be chained
together by adding additional conditions, using the '+' icon
on the right. All conditions are logically linked 'or' .

Fig
Alert conditions flow summary
The conditions are based on the total number of flows, packets or bytes passing the resulting filter. The numbers can be compared to an absolute value, or relative to various time based average values, which are automatically calculated. This allows to create easy adaptive filters, for detecting peaks.
Conditions may also be based on the top 1 statistic after filtering the flows. These are the well known top N statistics of nfdump.

Fig.
Alert conditions top 1
Up to 6 conditions of either conditions type may be linked together.
Triggers
Whenever the overall condition
evaluates to true, the trigger conditions apply. Depending on the
needs a trigger may fire each time the overall condition is true, or
once only as long as the condition is true and may block triggering
for a certain number of cycles thereafter.

Fig.
Alert Trigger
If a trigger is set to 'Once only' it needs to rearmed
manually, once the trigger fired. This is done by clicking on the
![]() icon in the top right corner in the alert details page.
icon in the top right corner in the alert details page.

Fig.
Arm 'Once Only' Trigger
Actions:
When a trigger fires, a certain
actions can be executed. Most often you may want to send an email as
an action. The action may also be disabled at all, to fine tune the
conditions to optimize a certain alert.
The alert status of each alert is visible as an overview in the alert tab, or on the top of each alert, when displaying the alert. The possible states be be:
![]()
This
alert is not active and is not evaluated.
![]()
This
alert is active, and is evaluated each cycle for the condition to
met.
![]()
This
alert is active and is evaluated each cycle. The last overall
condition was true, but needs 3 conditions ( definable ) in a row to
fire the trigger. So far one of tree conditions are true.
![]()
This
alert is active and is evaluated each cycle. The trigger just fired
in the last cycle and executed the action assigned to this alert,
![]()
This
alert fired once only and is no longer active. The alert needs to be
rearmed manually.
![]()
This
alert is active, but blocked for 2 cycles ( definable ) after the
trigger fired. Currently one of the two blocked cycles are already
over.
When clicking on the alert tab in the navigation bar, an overview of all alerts is show. An individual alert can be viewed in more details, when clicking on the looking glass of the alert in question. The alert list is automatically updated each cycle to refresh the state of all alerts.

Fig.
Alert List
The alert details dialogue allows you to review and edit the alert. The alert can be modified by clicking on the edit icon in the top left of the dialogue. All relevant input fields and selection boxes are enabled and can be changed as needed. The bottom half of the alert details view contains a graph with all calculated average values as a result of the filter. This should help you to find appropriate values for the conditions. A vertical cursor in the graph shows at what time the alert triggered last. Up to 6 last trigger cursors are shown. Older triggers are removed again.

Fig.
Alert Info
The table below the graph shows all average values of the last time-slot as numbers. The radio button allows you to switch between the flows, packets or bytes view. A summary of all conditions as well as the resulting overall condition of the last cycle are displayed at the bottom of this table.
Alert conditions as well as alert actions can be based on custom plugins. Check the Plugin Guide for a detailed description on how to work with plugins and alerts.
While working with NfSen, you may want to bookmark the current situation for later use or to send it as a link to a friend. The bookmark link at the top right of the page, allows you to do that.

Fig.
Bookmark
Clicking on the link places the bookmark URL into the URL input field of your browser, allowing you to add this link to your bookmark collection. Many browsers also allow you 'right click' a link to copy the link location for pasting it in another application.
NfSen may be extended with plugins to fit additional needs. Plugins may be selected from the navigation bar.. For a detailed explanation about plugins and how to write plugins, see the detailed Plugin Writers Guide.
Example: Port tracker plugin:
![]()
Fig
Port tracker
The command line tool 'nfsen' in the BASEDIR/bin directory works hand in hand with the frontend. It's used to create and manage profiles as you can do with the frontend in the 'Stat' tab. Use nfsen --help to see all options available for nfsen. If you create or delete a profile on the command line, the changes may not be instantly visible in the web browser. Switching to the 'Stat' tab updates the application cache and the profile menu. A separate nfsen command line guide should be available soon.


