NfSen
- Netflow
Sensor
What
is NfSen?
NfSen is a graphical web based front end for the nfdump
netflow tools.
NfSen allows you to:
- Display your netflow data:
Flows, Packets and Bytes using RRD
(Round Robin Database).
- Easily navigate through the
netflow data.
- Process the netflow data
within the specified time span.
- Create history as well as
continuous profiles.
- Write your own plugins to
process netflow data on a regular
interval.
Different tasks need different interfaces to your netflow data. NfSen
allows you to keep all the convenient advantages of the command line
using nfdump directly and gives you also a graphical overview over your
netflow data.
NfSen is available at sourceforge
and distributed under the BSD license.
Note: All IP addresses in this document are anonymized.
Stable version:
Mar 8th 2006 Version 1.2.4 - for use with nfdump 1.5 netflow v9 and IPv6
Snapshot version:
Feb 1st 2007 snapshot-20070201 - for use with nfdump snapshot-20070110 netflow v9 and IPv6
Old release
Sept 12th 2005 Version 1.2.1 - for use with nfdump 1.4.1
NfSen is hosted by Sourceforge:
Table
of Content
- NfSen
- Netflow
Sensor
- What
is NfSen?
- Table
of Content
- Screenshots
- Installing
NfSen
- Prerequisites:
- First
Installation
- Master
Config File:
- Importing
existing
netflow data
- Start-Stop
NfSen
- Upgrading
NfSen
- Working
with NfSen
- Views
- Profiles
- Profile
Types
- Creating
profiles
- Managing Profiles
- Navigation
- Selecting
a time slot
or a time window
- Statistic
Summary
- Graph Display Options
- Netflow
Processing
- Filter Syntax
- Options
- Default
Filters
- Bookmarks
- Command
line tool
'nfsen'
- Plugins
- Installing
Plugins
- Writing
Backend Plugins
- Testing
Backend Plugins
- Writing Frontend
Plugins
- Optional
Modules
- Notification.pm
Screenshots
 |

|
|
NfSen
- General Overview Page
|
NfSen
- Flow Overview Page
|
NfSen
- Navigation Page
|
|
 |
|
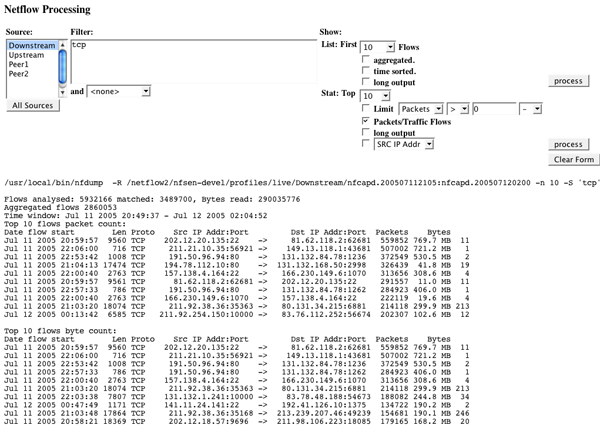
NfSen
- Netflow Processing output
|
NfSen
- Profile Info
|
|
Installing
NfSen
Prerequisites:
- PHP and Perl:
NfSen is written in PHP and Perl and should run on any *NIX system.
At least Perl 5.6.0 and PHP > 4.1 is required including the Perl
regex
extension.
- RRD tools
For the netflow graphs, NfSen requires the RRD tools, at least the RRDs
Perl Module.
All about
RRD here.
- Nfdump tools
The nfump tools are the backend tools for NfSen and will collect and
process the netflow data.
Make sure you have at least version 1.4. You can download nfdump from
sourceforge nfdump.sourceforge.net.
First
Installation
NfSen v1.2.1 has a very flexible directory layout. To simplify matters,
the default layout stores everything but the html pages under BASEDIR.
However, you may configure NfSen to fit your local needs. The figure
below shows the default layout with all configurable directories.
All netflow data is stored under PROFILEDATADIR. So make sure you have
enough disk space for this directory.
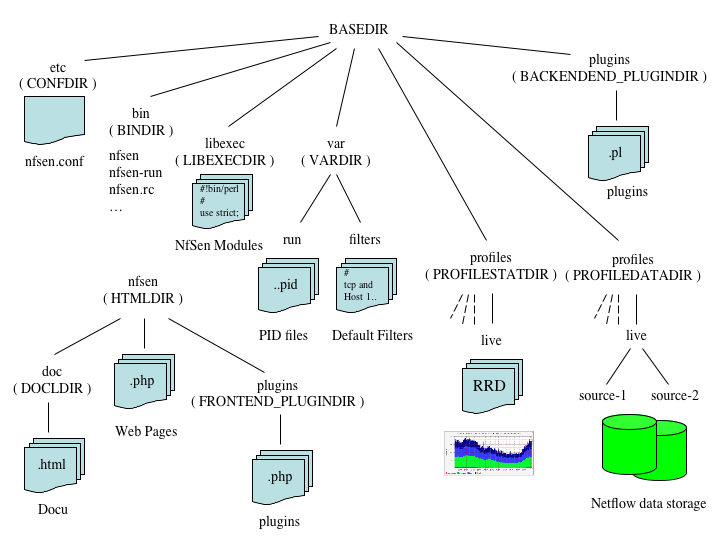
Directory
Structure
If you have installed all prerequisites, change to the etc directory
and copy the NfSen template config file nfsen-dist.conf to nfsen.conf.
Edit nfsen.conf according your needs and setup:
Master
Config File:
##############################
#
# NfSen master config file
#
# Configuration of NfSen:
# Set all the values to fit your NfSen setup and run the 'install.pl'
# script from the nfsen distribution directory.
#
# You should not need to changes anything after NfSen is installed,
# besides the NfSen plugins at the bottom.
# When you make any changes in the plugins section, run 'nfsen reload'
# to make sure nfsen-run gets notified about your plugins.
#
# Do not change any other settings after NfSen is installed.
# otherwise you must rerun the install.pl script.
#
# The syntax must conform to Perl syntax.
#
##############################
#
# NfSen default layout:
# Any scripts, modules or profiles are installed by default under $BASEDIR.
# However, you may change any of these settings to fit your requested layout.

#
# Required for default layout
$BASEDIR = "/data/nfsen";

#
# Where to install the NfSen binaries
$BINDIR="${BASEDIR}/bin";

#
# Where to install the NfSen Perl modules
$LIBEXECDIR="${BASEDIR}/libexec";

#
# Where to install the config files
$CONFDIR="${BASEDIR}/etc";

#
# NfSen html pages directory:
# All php scripts will be installed here.
# URL: Entry point for nfsen: http://<webserver>/nfsen/nfsen.php
$HTMLDIR = "/var/www/nfsen/";

#
# Where to install the docs
$DOCDIR="${HTMLDIR}/doc";

#
# Var space for NfSen
$VARDIR="${BASEDIR}/var";

#
# The Profiles stat directory, where all profile information
# RRD DBs and gif pictures of the profile are stored
$PROFILESTATDIR="${BASEDIR}/profiles";

#
# The Profiles directory, where all netflow data is stored
$PROFILEDATADIR="${BASEDIR}/profiles";

#
# Where go all the backend plugins
$BACKEND_PLUGINDIR="${BASEDIR}/plugins";

#
# Where go all the frontend plugins
$FRONTEND_PLUGINDIR="${HTMLDIR}/plugins";

#
# nfdump tools path
$PREFIX = '/usr/local/bin';

#
# BASEDIR unrelated vars:
#
# Run nfcapd as this user
# This may be a different or the same uid than your web server.
# Note: This user must be in group $WWWGROUP, otherwise nfcapd
# is not able to write data files!
$USER = "netflow";

# user and group of the web server process
# All netflow processing will be done with this user
$WWWUSER = "www";
$WWWGROUP = "www";

# Receive buffer size for nfcapd - see man page nfcapd(1)
$BUFFLEN = 200000;

# Netflow sources
# Define an ident string, port and colour per netflow source
# ident identifies this netflow source. e.g. the router name,
# Upstream provider name etc.
# port nfcapd listens on this port for netflow data for this source
# col colour in nfsen graphs for this source
#
# Syntax:
# 'ident' => { 'port' => '<portnum>', 'col' => '<colour>' }
# Ident strings must be 1 to 19 characters long only, containing characters [a-zA-Z0-9_].

%sources = (
 'upstream1' => { 'port' => '9995', 'col' => '#0000ff' },
 'peer1' => { 'port' => '9996', 'col' => '#ff0000' },
);

#
# Low water mark: When expiring files, delete files until
# size = max size * low water mark
# typically 0.9
$low_water = 0.9;

#
# syslog facility for periodic jobs
# nfsen uses level 'debug', 'info', 'warning' and 'err'
# Note: nfsen is very chatty for level 'debug' and 'info'
# For normal operation, you may set the logging level in syslog.conf
# to warning or error unless you want to debug NfSen
$syslog_facility = 'local3';

#
# plugins
# plugins are run for each timeslot, after the roll over of new data files.
# A plugin may run for any profile or for a specific profile only.
# Syntax: [ 'profile', 'module' ]
# profile: ',' separated list of profiles, or "*' for any profile
# module: Module name.
# The module follows the standard Perl module conventions, with at least two
# additional functions: Init() and run(). See demoplugin.pm for a simple template.
# Plugins are installed under
#
# $BACKEND_PLUGINDIR and $FRONTEND_PLUGINDIR

@plugins = (
 # profile # module
 # [ '*', 'demoplugin' ],
);

#
# Notification module
# The Notification module is an optional module. If you want your plugins to
# notify any result by email, use this module.
# Make sure you have installed Mail::Internet before using the module
#
# Use this from address
$MAIL_FROM = 'your@from.example.net';

# Use these recipients
$RCPT_TO = 'any@example.net, another@example.net';

# Use this SMTP server
$SMTP_SERVER = 'localhost';

1;
When you are done with nfsen.conf, run the install.pl script in the
NfSen distribution
directory:
./install.pl etc/nfsen.conf
Running install.pl will:
- Create the NfSen environment
under BASEDIR
- Copy the php/html files into
the HTMLDIR
- Create the live profile.
- Prepares the RRD DBs for the
live profile.
- Creates and configures
config.php
After the installation, you will find the nfsen.conf file in CONFDIR.
This documentation, is installed in DOCDIR. If you want this
document available as Help link in the Web Frontend,
uncomment line 18 in navigation.php:
// print "<a href='doc/NfSen.html' target='_blank' >Help</a>\n";
Importing
existing
netflow data
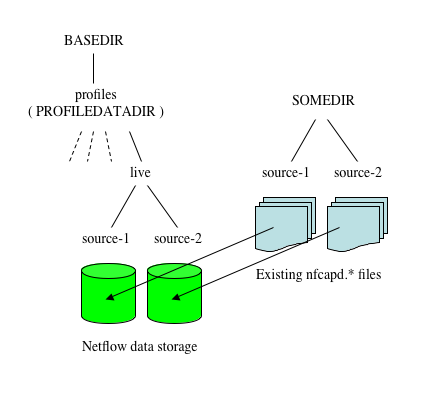 If you have existing netflow data
from nfdump, follow these steps:
If you have existing netflow data
from nfdump, follow these steps:
- cd BASEDIR/profiles/live
- Copy already existing data
into the appropriate directory or make
sure you have a softlink from the source directory to your flows.
- cd BASEDIR/bin and rebuild
the profile live:
./nfsen -r live
The live profile is now setup with your existing data. You can verify
your profile: ./nfsen -l live. The status of the profile is set to
'rebuild' which will change automatically to 'OK' the first time the
periodic task of nfsen-run is executed.
Make sure to disable your current start/stop script, as NfSen will
provide it's own start/stop script to start all required nfcapd
processes, as well as the nfsen-run background process. The nfdump
cleanup script nfclean.pl
isn't needed either, as expiring the netflow data is fully
integrated into
NfSen.
Start-Stop
NfSen
NfSen provides a start-stop script nfsen.rc
in BINDIR. You may create a soft link from your appropriate rc.d
directory to this file.
To start NfSen:
This starts all nfcapd processes to collect the netflow data and the
nfsen-run background process to update your profiles, as new data
becomes available. Point your web browser to nfsen.php. ( Typically
http://yourserver/nfsen/nfsen.php ).
The background task nfsen-run as well as nfcapd log to syslog.
nfsen-run is very chatty, when configuring syslog priority 'info' or
less. You may want to set the syslog priority to 'warning' for
normal operation. For debugging purpose, use 'info' or 'debug'.
Upgrading
NfSen
To upgrade your current NfSen installation:
- Change to the directory
where you unpacked NfSen.
- If you upgrade from NfSen
v1.1, add the missing directory config statements to your existing
nfsen.conf file. To reflect the NfSen v.1.1 directory layout, add the
following lines after the HTMLDIR variable:
# Where to install the binaries
$BINDIR="${BASEDIR}/bin";
#
# Where to install the NfSen Perl modules
$LIBEXECDIR="${BASEDIR}/libexec";
#
# Where to install the config files
$CONFDIR="${BASEDIR}/etc";
#
# Var space for NfSen
$VARDIR="${BASEDIR}/var";
#
# Where to install the docs
$DOCDIR="${HTMLDIR}/doc";
#
# The Profile stat directory, where all information and RRD DBs of the profile are stored
$PROFILESTATDIR="${BASEDIR}/profiles";
#
# The Profile directory, where all netflow data is stored
$PROFILEDATADIR="${BASEDIR}/profiles";
#
# Where go all the backend plugins
$BACKEND_PLUGINDIR="${BASEDIR}/libexeec";
#
# Where go all the frontend plugins
$FRONTEND_PLUGINDIR="${HTMLDIR}/plugins";
- If you feel ok with the
current directory layout goto step 4.
If you want to rearrange the directory layout:
- Run:
./install.pl <path/to/your/existing/nfsen/etc/nfsen.conf>
- Start NfSen:
BINDIR/nfsen.rc start
This will update your current NfSen installation without affecting your
netflow
data.
Working
with NfSen
NfSen has two different user interfaces:
- Web Interface
- Command line interface
Most of the time you will want to use the web interface. However, you
can do everything from the command line as well.
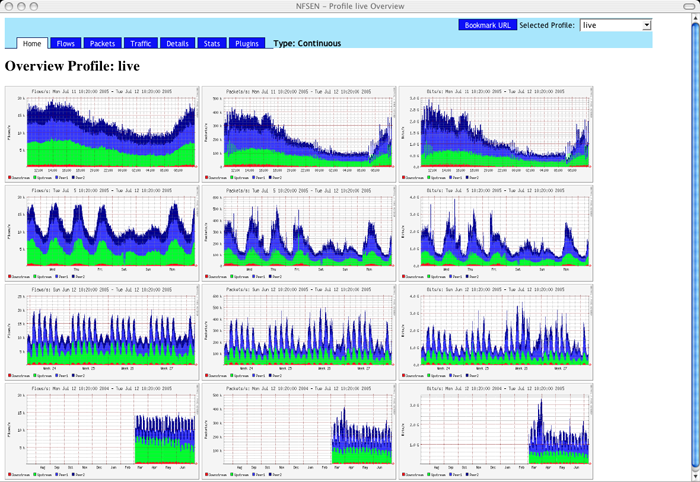
Views
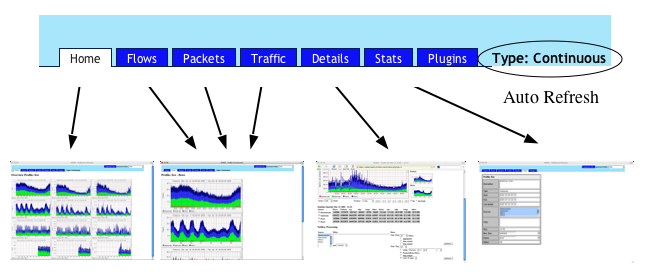
Tab Navigation
NfSen offers different views. Each of the views can be
selected
using the tabs at the top of the page. When you point your browser to
the nfsen.php page, The 'Home' view is the default view and
shows
an overview of the currently selected profile. The three columns show
the 'Flows', 'Packets' and 'Bytes' history. To select a different view,
click into any graph or select the view in the tab, e.g. clicking into
the column of the bytes history switches to the bytes view. Clicking
into any graph in the 'Flows', 'Packets' or 'Bytes' view switches to
the 'Detailed' view for a further analysis of the netflow data.
If the currently selected profile is a continuous profile, the history
pages are automatically refreshed every 5 minutes to update the graphs.
This allows you to have a browser window on your screen, with always up
to date graphs.
Detailed information about the currently selected profile is available
under the 'Stats' tab.
Profiles
A profile is a specific view on the netflow data. A profile is defined
by its name,
type
and profile filter,
which is any valid filter
accepted by nfdump.
At least the profile 'live'
is
always available and is used to store your incoming netflow data
without filtering. You can switch back and forth to any profile using
the pull down menu in the upper right corner of the web page.
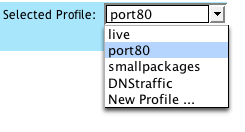
Profile Selection
Profile
Types
A profile can be either of type History
or Continuous.
A history
profile starts and ends back in the past and remains static. It neither
grows nor expires. A continuous profile may start in the past and is
continually updated while new netflow data becomes available. It grows
dynamically and may have its own expire values set. Old data expires
after a given amount of time or when a certain profile size is reached.
Creating
profiles
Select the "New profile ..." entry in the profile pull down menu.
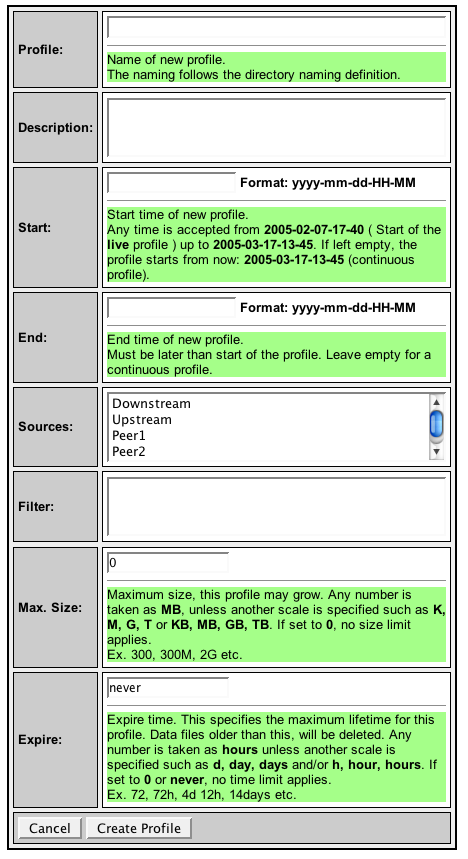 Complete
the 'New Profile' form to start building the profile. The profile type
is automatically detected according the 'Start'
and 'End'
values you enter. The help text
should guide you through the process of creating the profile.
Complete
the 'New Profile' form to start building the profile. The profile type
is automatically detected according the 'Start'
and 'End'
values you enter. The help text
should guide you through the process of creating the profile.
As profiles are created from netflow data from profile 'live', the
start and end of the profile must fall in the time range of the profile
'live'.
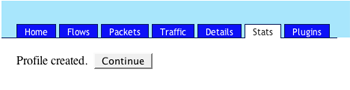
Successful creation of new profile.
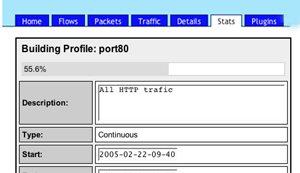
Progress of building the profile
Managing Profiles
Once a profile is created you can change the expire settings of a
continuous profile. Select the 'Stat'
tab of the profile and click on the edit icon  of the
appropriate expire value. A
continuous profile may expire due to the age of the data or the profile
size used on disk. Expiring starts whenever one of the two limits is
reached. Expiring ends at the configured value $low_water
in the config file
nfsen.conf.
of the
appropriate expire value. A
continuous profile may expire due to the age of the data or the profile
size used on disk. Expiring starts whenever one of the two limits is
reached. Expiring ends at the configured value $low_water
in the config file
nfsen.conf.
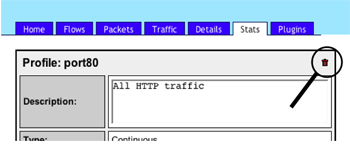
Delete Profile
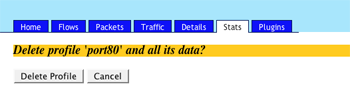
Confirm Delete Profile
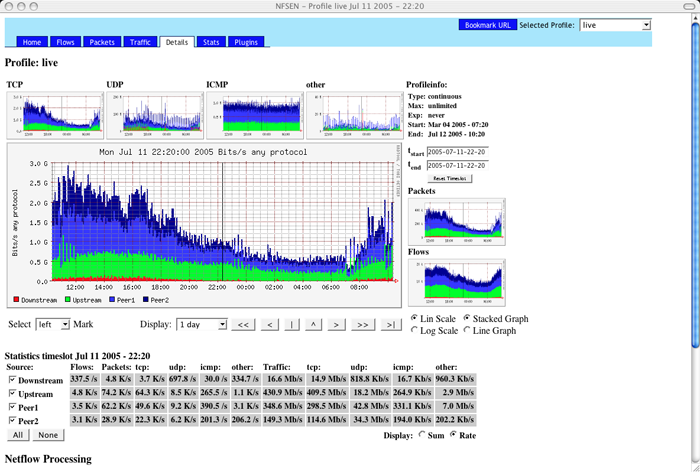
Navigation
Detailed navigation and netflow processing is done in the 'Details'
view. When entering this view, you will see the navigation display.
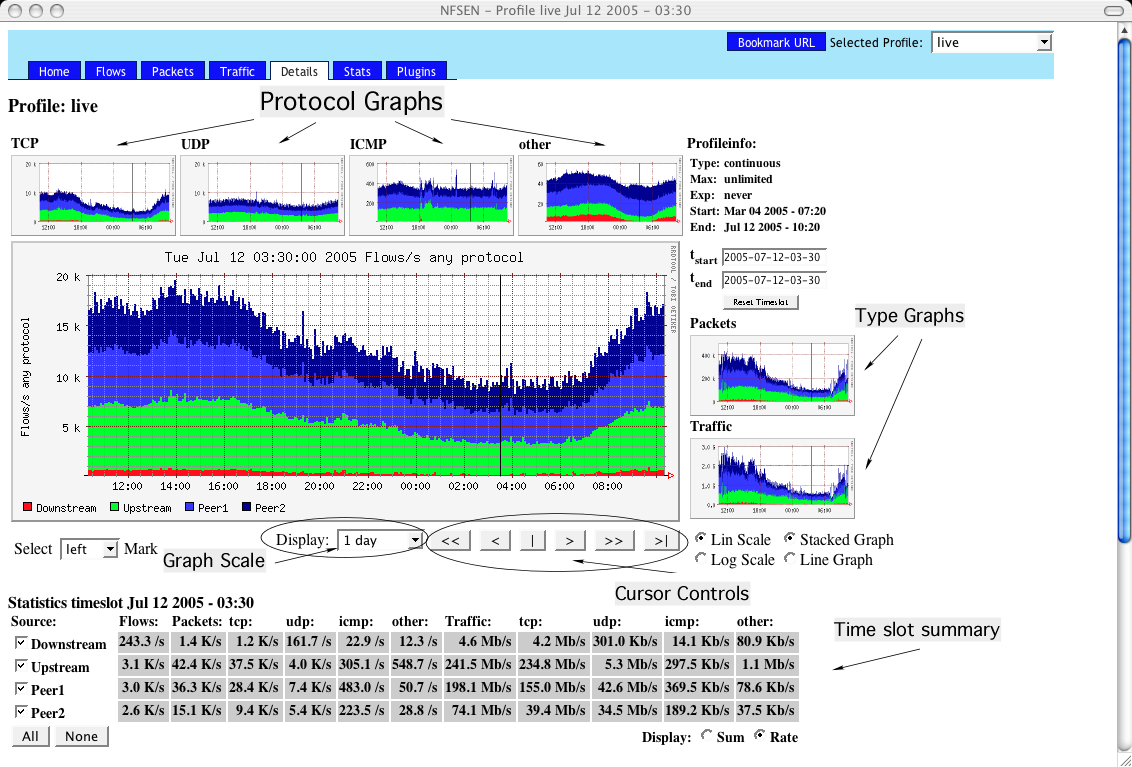
Navigation Display
The
page is divided into two parts: The
upper part allows you to navigate through the netflow data as well as
selecting a time slot or time window. The lower part contains all the
controls to process the netflow data of the selected time slot or time
window.
The time span of the graph can be changed using the pull down menu.
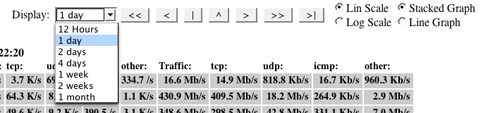
Select Time Span
Selecting
a time slot
or a time window
A time slot starts at every 5 minutes cycle of the hour ( 0, 5, 10, 15
etc. ) and lasts 5 minutes. A time window consists of several time
slots.When entering the '
Details view'
a window scale of one days is selected so you will see the last 24
hours of the profile. The time cursor is placed in the middle of the
begin and end of these 24 hours and the time window slot is set to one
time slot. You will see the selected time slot or time window always in
the title of the browser window as well as in the title of the main
graph. Selecting a different time slot can be done in a number of ways:
- Clicking into the main
graph, for example when you see a
suspicious peak.
- Using
the time cursor
controls:

| > |
Next
time slot: Advance time by 5
minutes. |
| < |
Previous
time slot: Go back 5
minutes. |
| >> |
Advance
time slot by a full time
span of the graph. |
| << |
Go
back by a full time span of the
graph. |
| >| |
Go
to the end of the profile. |
| | |
Center
time cursor in current graph. |
| ^ |
Place cursor at peak, found within +/- 1 hour timespan of
current cursor position. |
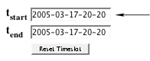
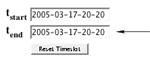
Entering the timeslot of interest in the tstart
input field
and press the enter key.
The graphs are immediately updated, when selecting a different time
slot.
Sometimes it is desirable to process more than a single 5 min timeslot.
The time range of interest an be selected by extending the time window.
First, place the time cursor on the left edge of he requested time
window, using the methods described above. Then, select the right edge
of the time window by:
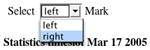
Select 'right' Mark from the pull down menu and click into
the
main graph.
or
Enter the the right boundary in the t
end
input field and
press the enter key.
The main graph will be immediately updated with the selected time
window:
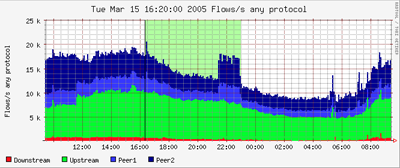
Selected Time Window
- A selected time window may
be shifted by selecting a new left
boundary. The size of the time window remains.
- To adjust the window size,
select a new right window boundary.
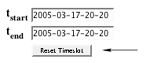
To reset the window to the default size use the button below the tstart,
tend
input boxes.
When you move the timeslot towards the begin of the profile, a grayed
out area in the main graph appears and shows the end of the available
netflow data. No data exists in the gray area. This border moves
dynamically, when data expires. The run of the flows, packets and bytes
graph may still be available, as this data is stored in the RRD
database.
Border of available Data
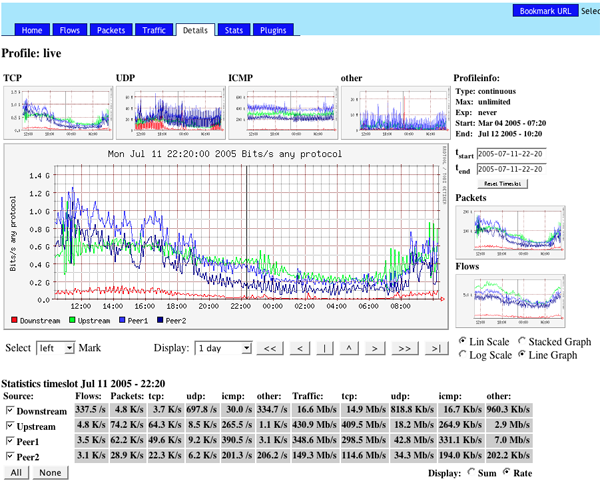
Statistic
Summary
The statistic summary below the main graph gives you an overview about flows,
packets
and traffic
of the selected time slot or
time window. The summary can be switched between the total sum of the
selected time window, or the rate values per second.
Each line corresponds to one configured netflow source. If you are
interested in only some of the sources, you may remove the others by
clicking the checkboxes. This disables or enables this source
in
all graphs and in the statistics respectively.
Disabled sources 'Downstream' and 'Peer1'
As this rescales the graphs according the remaining sources, you get a
more detailed graph and a different resolution on the y-axis.
Graph Display Options
To view the details your are interested in, a graph may be displayed
with different options:
- Scale:
- Linear y-axis
- Logarithmic y-axis.
- Graph Type:
- Stacked: All sources are drawn on top of each other.
- Line: All sources are drawn independent.
Example of a line graph:
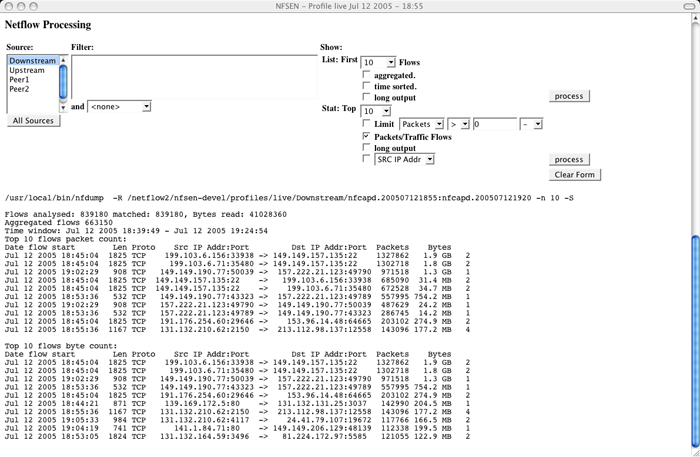
Netflow
Processing
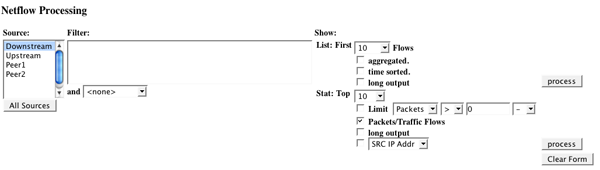
Once you have selected the time window of interest, you can process and
filter the netflow data according your needs, using the process form.
- Select the netflow sources
to process. You may select multiple
sources.
- Enter a netflow filter. The
syntax conforms to the nfdump filter
syntax.
- Select any options.
Click 'process'.
The sources, the filter as well as all options from the processing form
are compiled into the appropriate nfdump command. For convenience a
short description of the filter syntax and options follows. More
details are available in the nfdump(1) man page.
Filter Syntax
The
filter syntax is similar to the
well known pcap library used by tcpdump. The filter can span
several lines. Anything after a '#' is treated as a comment
and
ignored to the end of the line. There is virtually no limit in length
of the filter expression. All keywords are case independent, unless
otherwise noted.
Any filter consists of one or more expressions
expr.
Any number of
expr
can be linked together:
expr and expr, expr or expr, not expr, ( expr ).

Expr can be one of the following filter primitives:

Any
 any Flows. Used as dummy filter. Use 'not any' to block all flows.

protocol
 TCP, UDP, ICMP or PROTO num where num is the protocol number.

IP address
 [SourceDestination] IP a.b.c.d or HOST a.b.c.d with a.b.c.d as any valid IP address.

[SourceDestination]
 defines the IP address to be selected and can be SRC DST or any combination of SRC and|or DST.
 Omitting SourceDestination is equivalent to SRC or DST.

[inout]
 defines the interface to be selected and can be IN or OUT.

network
 [SourceDestination] NET a.b.c.d m.n.r.s
 [SourceDestination] NET a.b.c.d/num with a.b.c.d as network number, m.n.r.s as netmask or num
 as maskbits. The network may be given as a.b, a.b.c, where a B or C-class
 equivalent netmask is assumed.

Port
 [SourceDestination] PORT [comp] num with num as a valid port number. If comp is omitted, '=' is assumed.

Interface
 [inout]  IF num with num as an interface number.

Flags
 flags tcpflags
 With tcpflags as a combination of:
 A ACK.
 S SYN.
 F FIN.
 R Reset.
 P Push.
 U Urgent.
 X All flags on.
The ordering of the flags is not relevant. Flags not mentioned are treated as don't care. In order
to get those flows with only the SYN flag set, use the syntax 'flags S and not flags AFRPU'.

TOS
 tos value
 Type of service: Value 0..255.

Packets
 packets [comp] num
 Limit the packet count in the netflow record.

Bytes
 bytes [comp] num
 Limit the byte count in the netflow record.

[comp]
The following comparators are supported:
 =, ==, >, <, EQ, LT, GT. If comp is omitted, '=' is assumed.

AS
 [SourceDestination] AS num with num as a valid AS number.

Examples:
tcp and ( src ip 172.16.17.18 or dst ip 172.16.17.19)

tcp and ( net 172.16/16 and src port > 1024 and dst port 80 ) and bytes > 2048
Options
The list of the following options are used to compile the nfdump
command. See
also the nfdump man page for further details.
| List Options |
|
| List
First N Flows |
List
only the first N flows of the
selected time slot
nfdump option: -c N |
| aggregated |
Aggregate
the flows: SRC IP, DST IP,
SRC Port, Dst Port
nfdump option: -a |
| time
sorted |
Sort
all flows according the time first
seen, when reading data from multiple netflow sources. Important when
tracking a certain period of time.
nfdump option: -m |
| long output |
Include TCP flags and
tos field in output
nfdump option: -o long |
| Statistic
options |
|
| Stat
Top N |
Limit
the statistics to the first N
nfdump option: -n N |
| Limit
Packets/Bytes |
After
creating the statistics, only
show aggregated flow with more/less packets/flows than specified.
nfdump option: +/-l num +/- L num |
| Packets/Bytes |
Create
the bytes and packets statistics
nfdump option: -S |
| long
output |
Include
TCP flags and tos field in
output.
nfdump option: -o long |
| SRC
IP Addr. |
Create
statistics about selected
parameter.
nfdump option: -s <stat type> |
Note:
Depending on the size of your network, netflow processing may consume a
lot of time and resources, when you select a large time window and
multiple resources.
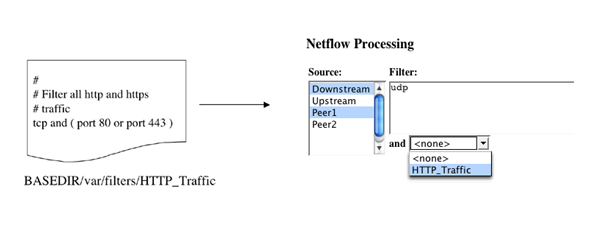
Default
Filters
Frequently used processing filters can be stored in a file under
BASEDIR/var/filters. These filters will be available in the processing
form. The name of the filter in the menu corresponds to the file name.
The filters use the standard nfdump syntax.
The default filter is combined with the filter you enter in the text
box. Both filters are linked with logical 'and'.
If a new installed filter is
not visible in the menu after installing you may update the application
cache by switching to the 'Stat'
tab and back again.
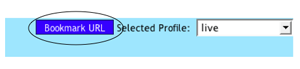
Bookmarks
While working with NfSen, you may want to bookmark the current
situation for later use or to send it as a link to a friend. The
bookmark link at the top right of the page, allows you to do that.
Clicking on the link places the bookmark URL into the URL input field
of your browser, allowing you to add this link to your bookmark
collection. Many browsers also allow you 'right click' a link to copy
the link location for pasting it in another application.
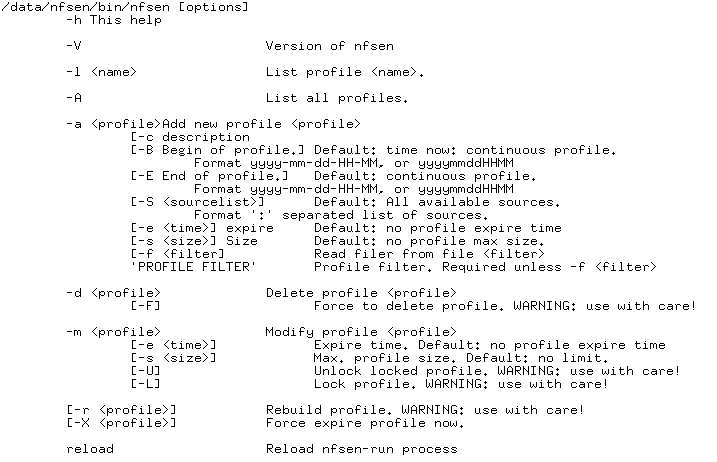
Command
line tool
'nfsen'
The command line tool 'nfsen'
in the BASEDIR/bin directory works hand in hand with the frontend. It's
used to create and manage profiles as you can do with the frontend in
the 'Stat'
tab. Use nfsen
-h to see all options
available for nfsen:
If you create or delete a profile on the command line, the
changes may not be instantly visible in the profile menu. Switching to
the 'Stat'
tab
updates the application cache and the profile menu.
Plugins
Even if NfSen is a flexible tool, you may have different or additional
needs to process and display netflow data. This can be done using the
plugin
feature provided by NfSen. There are two type of plugin: Backend
plugins and Frontend
plugins.
The backend plugins are installed in 'nfsen-run',
the background daemon,
which keeps track with all the profile updates and data expiring. The
plugins are Perl modules which are loaded when NfSen is started or
reloaded and run
at every 5 min interval, when nfcapd rolls over the data files. This
allows you the process new netflow data as it becomes available and
trigger any action of your choice. The backend plugin may store the
output of the data processing, which in turn may be displayed with the
frontend plugin. A frontend plugin is a simple php script, which is
hooked into the web frontend and may display any results from the
backend processing.
Installing
Plugins
Plugins are stored in the BACKEND_PLUGINDIR and FRONTEND_PLUGINDIR
respectively and are configured in nfsen.conf.
The configuration section is at the bottom of this file:
#
# plugins
# plugins are run for each timeslot, after the roll over of new data files.
# A plugin may run for any profile or for a specific profile only.
# Syntax: [ 'profile', 'module' ]
# profile: ',' separated list of profiles, or "*' for any profile
# module : Module name.
# The backend plugin is a Perl module and follows the standard
# Perl module conventions, with at least two additional functions: Init() and run().
# See demoplugin.pm for a simple template.
# The frontend plugin is a PHP script with dedicated functions
# <modulename>__ParseInput(), as well as <modulename_Run();

@plugins = (
	# profile # module
	[ '*', 'demoplugin' ],
);
Once
your modules are installed and configured, signal
the 'nfsen-run'
daemon to integrate the
new plugin:
BASEDIR/bin/nfsen reload
Have a look at the syslog file for errors when loading the plugins.
Writing
Backend Plugins
Writing backend plugins is as easy as writing Perl modules. The
template for a
plugin may at least look like the example below:
#
#
package PluginName;

use strict;
use NfConf;

sub run {
	my $profile = shift;
	my $timeslot = shift; # Format: yyyymmddHHMM

	# Do whatever you want to do.
}

sub Init {
	return 1;
}

1;
The plugin has to provide at least two functions: Init() and run().
Init() is called, when the plugin is loaded. You may do any plugin
specific initialization work. Return 1 for a successful initialization
and to add your plugin to the plugin list. Returning 0 disables your
plugin and prevents the plugin from running.
The run() function is called periodically every 5 min, when new data
becomes available. The first parameter specifies the profile name, the
second parameter the new timeslot in the format 'yyyymmddHHMM'.
Profile specific information can be retrieved using the NfSen.pm and
NfConf.pm modules. See the demo plugin 'incmod' included in
the
NfSen distribution.
Demo plugin demoplugin.pm:
#
# Demo plugin for NfSen
#
# This plugin demonstrates the use of plugins
# It searches for flows > 500000 packets and sends the output
# using the Notification module

package demoplugin;

use strict;
use NfSen;
use NfConf;

#
# The plugin may send any messages to syslog
# Do not initialize syslog, as this is done by
# the main process nfsen-run
use Sys::Syslog;
Sys::Syslog::setlogsock('unix');

# Use the optional Notification module
use Notification;

my ( $nfdump, $BASEDIR );

#
# Define a nice filter:
# We like to see flows containing more than 500000 packets
my $nf_filter = 'packets > 500000';

#
# Periodic function
# input: profilename
# timeslot. Format yyyymmddHHMM e.g. 200503031200
sub run {
	my $profile = shift;
	my $timeslot = shift;

	syslog('debug', "demoplugin run: Profile: $profile, Time: $timeslot");

	my %profileinfo = NfSen::ReadProfile($profile);
	my $netflow_sources = "$BASEDIR/profiles/$profile/$profileinfo{'sourcelist'}";

	#
	# process all sources of this profile at once
	my @output = `$nfdump -M $netflow_sources -r nfcapd.$timeslot '$nf_filter'`;

	#
	# Process the output and notify the duty team

	# The 2nd but last line contains the stat info of the processed flow:
	# e.g. Flows analysed: 61 matched: 61, Bytes read: 3168
	if ( $output[-2] =~ /matched:\s+(\d+)/ ) {
	my $matched = $1;
	syslog('debug', "demoplugin run: $matched flows");
	if ( $matched ) {
	notify("Packets > 500000: Profile $profile, Timeslot $timeslot", \@output );
	} else {
	syslog('err', "Unparsable output line '$output[-2]'");
	}


	# .... more to come

}

sub Init {
	syslog("info", "demoplugin: Init");

	# Init some vars
	$nfdump = "$NfConf::PREFIX/nfdump";
	$BASEDIR = "$NfConf::BASEDIR";

	return 1;
}

sub BEGIN {
	syslog("info", "demoplugin BEGIN");
	# Standard BEGIN Perl function - See Perl documentation
	# not used here
}

sub END {
	syslog("info", "demoplugin END");
	# Standard END Perl function - See Perl documentation
	# not used here
}


1;
Testing
Backend Plugins
Before installing your backend plugin in nfsen-run, test the plugin
with the testPlugin
script available in
BASEDIR/bin. The test scripts allows you to test the plugin
with
any available profile and timeslice:
./testPlugin -p <pluginname> -P <profile> -t <timeslot>
Writing Frontend
Plugins
Writing frontend plugins is as easy as writing PHP scripts. The
template for a
plugin may at least look like the example below. Each function is
called with a unique plugin_id, which identifies this plugin. It
can/should be used to perpend and variables when creating forms.
Example of an input field definition:
<input type='text' name='<? echo "${plugin_id}_port";?>' value='' size='5' maxlength='5' >
This allows to distinguish between different plugins and prevents
clashes with variable names in web forms.
Example template:
<?
/*
 * demoplugin frontend plugin template
 */
// Required functions
/*
 * This function is  called prior to any output to the web browser and is intended
 * for the plugin to parse possible form data. This function is called only, if this
 * plugin is selected in the plugins tab
 */
function demoplugin_ParseInput( $plugin_id ) {

	// Set possible warning or error message
	$_SESSION['warning'] = "Warning set by demo plugin!";
	$_SESSION['error'] = "Error set by demo plugin!";

	// Parse any GET[''] or POST[''] vars

} // End of demoplugin_ParseInput
/*
 * This function is called after the header with the navigation bar have been sent to the
 * browser. It's now up to this function what to display.
 * This function is called only, if this plugin is selected in the plugins tab
 */
function demoplugin_Run( $plugin_id ) {

	print "<h3>Hello I'm the demo plugin with id $plugin_id</h3>\n";

} // End of demoplugin_Run
?>
A frontend plugin is selected by the appropriate tab in the toolbar:
Optional
Modules
Optional modules are not required by NfSen. However, they make your
life easier when writing plugins.
Notification.pm
Plugins may produce some output to be sent to a duty team for further
analysis or for requesting some actions.
This module allows you to send emails with one single line: notify(<Subject>,
<BODY>);
The configuration parameters, such as From,
To
and SMTP
server are defined in the
master nfsen.conf file.
Example:
nfsen.conf:
....
#
# Notification module
# The Notification module is an optional module. If you want your plugins to
# notify any result by email, use this module.
# Make sure you have installed Mail::Internet before using the module
#
# Use this from address
$MAIL_FROM = 'your@from.example.net' ;

# Use these recipients
$RCPT_TO = 'any@example.net', another@example.net" ;

# Use this SMTP server
$SMTP_SERVER = 'localhost' ;


Somewhere in your plugin:

use Notification;
...

@output = some command;
notify("Suspicious Flows found", \@output);